ADVERTISEMENT
- Prepare the Cheesecake Filling:
Start by making the creamy cheesecake filling. In a large mixing bowl, beat the softened cream cheese with powdered sugar using an electric mixer until smooth and creamy, about 2 minutes. Scrape down the sides of the bowl as needed.
Next, add the heavy cream and vanilla extract, and continue beating on medium-high speed until the mixture becomes thick and holds soft peaks. If you like your cheesecake filling with a little more tang, add the lemon juice and mix to combine.
Once the filling is smooth and creamy, transfer it to a piping bag or a large zip-top bag with the tip cut off for easy assembly later.
- Prepare the Cones:
While the cheesecake filling is setting, crush the vanilla wafers into fine crumbs. You can do this by placing the cookies in a zip-top bag and gently rolling a rolling pin over them, or by pulsing them in a food processor.
Take your waffle cones and set them upright in a sturdy cup or holder to make filling them easier. If you don’t have a cone holder, you can lay them on a baking sheet or plate while you assemble the cones.
- Assemble the Banana Pudding Cheesecake Cones:
Start by adding a layer of crushed vanilla wafer crumbs to the bottom of each waffle cone. This gives a nice crunch and mimics the base of traditional banana pudding.
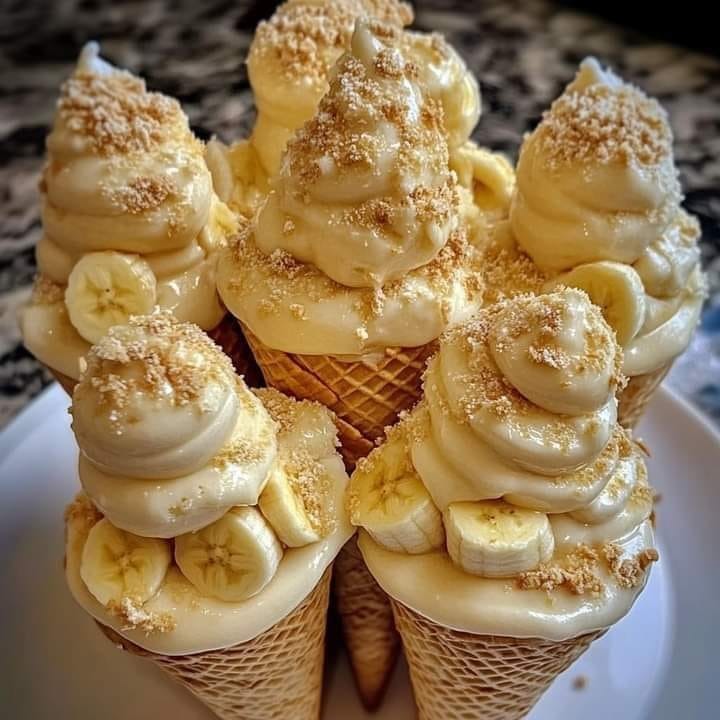
Next, pipe a layer of the cheesecake filling into the cone, using your piping bag to fill it about halfway. Press a few banana slices on top of the filling.
Add another layer of cheesecake filling, then repeat with more banana slices. Continue layering the cheesecake and banana slices until you reach the top of the cone, making sure the filling is smooth and even. Finish with a final layer of cheesecake filling on top to create a nice mound.
- Top with Whipped Cream and Garnish:
For an extra touch of sweetness and indulgence, top each Banana Pudding Cheesecake Cone with a dollop of whipped cream. You can either pipe the whipped cream on top or spoon it gently onto the cones.
Garnish with a few more slices of banana and crushed vanilla wafer crumbs. If you’re feeling extra decadent, drizzle a little caramel sauce over the top for a sweet finishing touch.
- Serve and Enjoy:
These Banana Pudding Cheesecake Cones are best enjoyed immediately, but if you need to prepare them ahead of time, refrigerate the cones for up to 2 hours before serving. This allows the flavors to meld together and gives the cheesecake filling time to set even more.
Serve the cones chilled and enjoy the perfect blend of creamy, crunchy, and sweet with every bite!
Why You’ll Love Banana Pudding Cheesecake Cones:
Two Classic Desserts in One:
Combining banana pudding and cheesecake in a fun and portable form, these cones are the best of both worlds. They capture the comforting, nostalgic flavors of banana pudding while adding the luxurious texture of cheesecake.
Portable and Fun:
The waffle cone serves as a perfect vessel for this dessert, making it easy to eat on the go. These cones are perfect for parties, BBQs, picnics, or any occasion where you want to serve a delicious dessert without the need for plates and forks.
Customizable:
While banana and vanilla wafers are the classic choices for this dessert, you can customize the cones with other ingredients. Consider adding a layer of chocolate chips, a drizzle of chocolate sauce, or even a sprinkle of cinnamon to give your cones a personal twist.
Made with Simple Ingredients:
This recipe uses basic ingredients that you likely already have in your kitchen, making it an affordable yet impressive treat. The cream cheese filling is easy to prepare and so much better than store-bought options.
Impressive Presentation:
The individual cones make for an eye-catching presentation, perfect for impressing guests or capturing the attention of your Instagram followers. Whether you’re serving them at a party or preparing them as a special treat for family, these cones are sure to be a hit.
Tips for Perfect Banana Pudding Cheesecake Cones:
Make Ahead: If you want to prepare these in advance, you can make the cheesecake filling and crush the vanilla wafers the day before. Simply assemble the cones right before serving to keep the bananas fresh and the whipped cream from wilting.
Avoid Soggy Cones: To prevent the waffle cones from becoming soggy, make sure to layer the vanilla wafer crumbs at the bottom and pipe the cheesecake filling on top of them. This acts as a barrier and helps keep the cones crunchy.
Banana Storage: Bananas tend to brown quickly, so slice them just before assembling the cones to keep them looking fresh and vibrant. If you need to prepare them ahead of time, you can sprinkle the banana slices with a little lemon juice to help preserve their color.
Decorate with Style: Get creative with the toppings! Try adding mini chocolate chips, a sprinkle of cinnamon, or even some crushed toffee or nuts for added flavor and texture.
Final Thoughts:
Banana Pudding Cheesecake Cones are a fun, portable, and utterly delicious dessert that combines two all-time favorites into one sweet treat. The combination of creamy cheesecake, fresh banana slices, and crunchy vanilla wafer crumbs is nothing short of heavenly. These cones are perfect for serving at any occasion and are guaranteed to delight both kids and adults alike.
Whether you’re hosting a party, enjoying a family get-together, or simply treating yourself to something sweet, these Banana Pudding Cheesecake Cones will hit the spot every time. So grab your waffle cones, your bananas, and your cheesecake filling ingredients—and get ready to indulge in a treat that’s as fun as it is tasty!
Enjoy your sweet, creamy, and crunchy creations!
ADVERTISEMENT
